اسلام و علیکم۔
امید ہے کہ آپ سب خریت سے ہوں گے۔
آج میں آپ کو ایکسل میں چیک بوکس بنانا سیکھاوں گا۔۔
امید ہے کہ آپ کو پسند آئے گا۔۔
Attached Images


اسلام و علیکم۔
امید ہے کہ آپ سب خریت سے ہوں گے۔
آج میں آپ کو ایکسل میں چیک بوکس بنانا سیکھاوں گا۔۔
امید ہے کہ آپ کو پسند آئے گا۔۔
Attached Images


The Following 6 Users Say Thank You to simpleproka For This Useful Post:
ilyas_99 (20th March 2010), kamirafiq2009 (9th January 2010), Kutkutariyaan (25th January 2010), Mujahid-e-Islam (21st December 2009), shairee (10th May 2010), Shehzad Iqbal (24th January 2010)
#2

Senior Member
Last Online: 25th March 2012 11:45 AM
Join Date: 02 Dec 2008
Location: Basirpur Okara
Posts: 794
Started threads: 86
Thanks: 6
Thanked 137 Times in 84 Posts
Thread Starter
Page 2
Attached Images
The Following 4 Users Say Thank You to simpleproka For This Useful Post:
IMUJ1 (24th March 2010), Kutkutariyaan (25th January 2010), Mujahid-e-Islam (21st December 2009), shairee (10th May 2010)
#3
Senior Member
Last Online: 25th March 2012 11:45 AM
Join Date: 02 Dec 2008
Location: Basirpur Okara
Posts: 794
Started threads: 86
Thanks: 6
Thanked 137 Times in 84 Posts
Thread Starter
Last Page!
Attached Images
Classification of Computers According to Purpose
1. General Purpose Computers
General purpose computers are designed to solve a large variety of problems. The different programs can be used to solve many problems. Most digital computers are general purpose computers and used in business and commercial data processing.
2. Special Purpose Computers
A computer designed for machine control or process control would be different than a general purpose computer. The special purpose computers are designed to solve specific problems. The computer program for solving a specific problem is built right into the computer. Most analog computers are special purpose computers. These special purpose computers are widely used in industrial robotics.
Types of Computers
1. Analog Computers
Analog computers are used to process continuous data. Analog computers represent variables by physical quantities. Thus any computer which solve problem by translating physical conditions such as flow, temperature, pressure, angular position or voltage into related mechanical or electrical related circuits as an analog for the physical phenomenon being investigated in general it is a computer which uses an analog quantity and produces analog values as output. Thus an analog computer measures continuously. Analog computers are very much speedy. They produce their results very fast. But their results are approximately correct. All the analog computers are special purpose computers.
2. Digital Computers
Digital computer represents physical quantities with the help of digits or numbers. These numbers are used to perform Arithmetic calculations and also make logical decision to reach a conclusion, depending on, the data they receive from the user.
3. Hybrid Computers
Various specifically designed computers are with both digital and analog characteristics combining the advantages of analog and digital computers when working as a system. Hybrid computers are being used extensively in process control system where it is necessary to have a close representation with the physical world.
The hybrid system provides the good precision that can be attained with analog computers and the greater control that is possible with digital computers, plus the ability to accept the input data in either form.
Classification of Computers According to Size
1. Super Computers
Large scientific and research laboratories as well as the government organizations have extra ordinary demand for processing data which required tremendous processing speed, memory and other services which may not be provided with any other category to meet their needs. Therefore very large computers used are called Super Computers. These computers are extremely expensive and the speed is measured in billions of instructions per seconds.
2. Main Frame Computers
The most expensive, largest and the most quickest or speedy computer are called mainframe computers. These computers are used in large companies, factories, organizations etc. the mainframe computers are the most expensive computers, they cost more than 20 million rupees. In this computers 150 users are able to work on one C.P.U. The mainframes are able to process 1 to 8 bits at a time. They have several hundreds of megabytes of primary storage and operate at a speed measured in nano second.
3. Mini Computers
Mini computers are smaller than mainframes, both in size and other facilities such as speed, storage capacity and other services. They are versatile that they can be fitted where ever they are needed. Their speeds are rated between one and fifty million instructions per second (MIPS). They have primary storage in hundred to three hundred megabytes range with direct access storage device.
4. Micro Computers
These are the smallest range of computers. They were introduced in the early 70’s having less storing space and processing speed. Micro computers of todays are equivalent to the mini computers of yesterday in terms of performing and processing. They are also called “computer of a chip” because its entire circuitry is contained in one tiny chip. The micro computers have a wide range of applications including uses as portable computer that can be plugged into any wall.
5. Laptop Computers
The smallest computer in size has been developed. This type of small computers look like an office brief case and called "LAPTOP" computer. The laptops are also termed as "PORTABLE COMPUTERS." Due to the small size and light weight, they become popular among the computer users. The businessmen found laptop very useful, during traveling and when they are far away frm their desktop computers. A typical laptop computer has all the facilities available in microcomputer. The smallest laptops are called "PALMTOP".
@import "/extensions/GoogleAdSense/GoogleAdSense.css";
Generations of Computer
First Generation of Computer (1946-1959)
Main Features
Major Innovation - Vacuum Tubes
Main Memory - Punched Cards
Input Output Devices - Punched cards and papers
Languages - Low level machine language
Operating System - No operating system, human operators to set
switches
Size - Main frame for example ENIAC, EDVAC, UNIVAC
The duration lasted from 1946-1959 was based on vacuum tubes. These vacuum tubes were about the size of 100 watt light bulb and used as the internal computer component. However because thousands of such bulbs were used, the computers were very large and generate a large amount of heat, causing many problems in temperature regulation and climate control.
In this generation input and out put device (punched card) that was used fro data storing purpose were very slow. The computers were operating manually and the language used was a low level machine language (symbolic language) with binary code that required a high programming skill. ENIAC, EDVAC, UNIVAC and Mark-1 were some of the major inventions of this generation.
Advantages of First Generation
1. Vacuum tubes were used as electronic component.
2. Electronic digital computers were developed for the first time.
3. These computers were the fastest calculating devices of their time.
4. Computations were performed in millisecond.
Disadvantages of First Generation
1. Too large in size.
2. They were unreliable.
3. Induce a large amount of heat due to the vacuum tubes.
5. Not portable.
6. Limited commercial use.
Second Generation of Computers (1959-1964)
Main Features
Major Innovation - Transistors as main component.
Main Memory - RAM and ROM.
External Storage - Magnetic tapes and Magnetic Disk.
Input Output Devices - Magnetic tapes and Magnetic Disk.
Languages - Assembly language, some high level languages for Example BASIC, COBOL, FORTRAN.
Operating System - Human handles punched card.
Size - Main frame for example IBM-1401, NCR-300, IBM-600 etc.
The period of this generation is from 1959 to 1964. During this period transistor were used for internal logic circuits of computers. These computers could execute 200000 instructions per second. The input/output devices became much faster by the use of magnetic table. During this period the low level programing language were used however the high level programming languages such as FORTRAN and COBOL were also used. The problem of heat maintenance was solved and size of computer reduced, while speed and reliability were increased. Many companies manufactured second generation computers and many of those for business applications. The most popular second generation computer was IBM-1401, introduced in 1960, while the following computers were used by many business organizations. IBM-1400 series, IBM-1600 series, UNIVAC-III, NCR-300 etc.
Advantages of Second Generation
1. Smaller in size as compares to 1st generation.
2. Much more reliable.
3. Less heat generated.
4. Computation was performing in micro second.
5. Less hardware and maintenance problem.
6. Could be used for commercial use.
Disadvantages of Second Generation
1. Very costly for commercial use.
2. It still required frequent maintenance.
3. Frequent cooling also required.
Third Generation of Computers (1965-1970)
Main Features
Major Innovation - Integrated circuit (ICs) as basic electronic component.
Main Memory - PROM and DRAM.
External Storage - Improve disk (Floppy Disk)
Input and Output Devices - Keyboard for input, monitor for output.
Languages - More high level languages.
Operating System - Complete operating systems were introduced.
Size - Mini, for example: IBM SYSTEM / 360, ICH-360, HONEY WELL-316 etc.
In this generation the integrated circuits (IC) were used. Integrated circuits contain many electronic components on a single chip. The disk oriented systems wee made at the end of this generation. The size of computer became very small with better performance and reliability. High level programming languages were extensively used. In 1969 the first microprocessor chip INTEL 4004 was developed but it was used only in calculators. The faster input/output devices made possible multi-processing and multi programming. Where by a number of input terminals could be run virtually at the same time on a single centrally located computer. The famous computer were IBM-360, IBM-370, UNIVAC 9000 series etc.
Advantages of Third Generation
1. Smaller in size as compared to second generation.
2. More reliable.
3. Portable
4. Less electricity consumption.
5. Heat generation was rare.
6. General purpose computer.
Disadvantages of Third Generation
1. Air conditioning was required in many cases due to ICs.
2. Very advance technology was required to make the ICs.
Even if we are still in 2013, some people still use Outlook Express (usually v.6 with Windows XP).The main problem of it, it’s the 2GB size limit for Inbox or Sent messages.
The error received is 0x800c0133 when trying to Send / Receive email. Also your INBOX may seem to be empty.
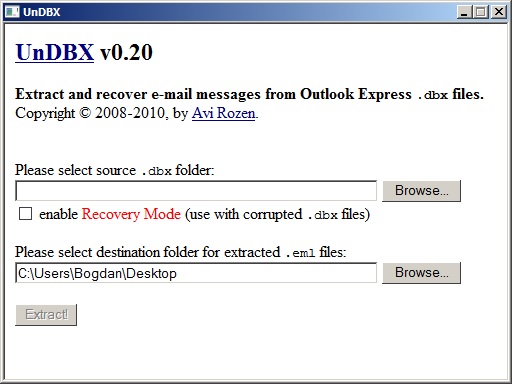
Outlook Express stores its messages in DBX files. To locate theese files you need to go in Outlook Express in : Tools | Options | Maintenance | Store Folder.
Locate the .dbx files and check if any of them has reached 2GB in size. If it’s not the case, this means one of the files may be damaged.
If you don’t care about the messages, you can rename the corresponding file. (If INBOX is empty rename inbox.dbx to something else, if Sent is empty rename sent.dbx to something else, and so on).
Close Outlook Express.
First thing to do is check for .bak files located in the same folder. They may be hidden, so be sure to check the “Show hidden files and folders” in Windows. If the INBOX seems empty, then rename inbox.dbx to something else, then rename the inbox.bak file to inbox.dbx.
Try to Open Outlook Express. If it’s still not working then you need to use a .DBX repair tool.
I recommend UnDBX – a free utility. This program can read a DBX file and export the messages as EML files. Thees files can then be imported in other email programs like Mozilla Thunderbird (by drag and drop).
It also has a “recovery checkbox” that can be used with damaged DBX files.
The program can be downloaded from Evilbox : undbx-0.20
Oter (paid) alternatives are : Repair Tool for Outlook Express or DBXpress.
Tags: 0x800c0133, 2GB limit, damaged dbx, inbox too big, outlook express
Buried in the comments of an androidcentral.com article showing a code to unlock "Service Mode," which allows for the testing of many features on the S3, I found the trick to open the gates of Valhalla! This works on my 4.1.2
The secret is to first type *#22745927 to get to an 'enable/disable hidden menu' screen. Check enable and you're good to go.
The code *#0*# gives this testing screen: 
Also, the code *#0011# works to access "Service Menu" and change the Wifi Power Save to off. It is thought that this might solve the Wifi disconnecting problem for some people.
Here's the link where I found it: How to uncover and use the hidden Service menu on the Galaxy S3 | Android Central
These codes work, too, though I've only tested a couple:
By below link
(1) *#06# : this code show Emei Number
(2) *#110*01# : this code show Enter into Engineering Mode
(3) *#987# : this code show Enter into factory Mode
(4) *#987*99# : this code show Restore Factory Settings
(5) *#900# : this code show Check Software Version
(6) *#800# : this code Check Software Version
(7) *#369# : this code Change LCD Contrast:
Some Default User Codes here: 1122, 3344, 1234, 5678
To Enable COM Port: *#110*01# -> Device -> Set UART -> PS Config -> UART1/115200
How to change screen language your Micromax mobile
**#0000# + [Dial Button] : use Set Default Language
**#0044# + [Dial Button] : use Set Language to English
**#0966# + [Dial Button] : use Set Language to Arabic
**#0007# + [Dial Button] : use Set Language to Russian
**#0033# + [Dial Button] : use Set Language to French
**#0034# + [Dial Button] : use Set Language to Spanish
**#0039# + [Dial Button] : use Set Language to Italian
**#0049# + [Dial Button] : use Set Language to German
**#0066# + [Dial Button] : use Set Language to Thai
**#0084# + [Dial Button] : use Set Language to Vietnamese
Note: We will not be responsible for any damage of your phone.
Most interesting hacks require root and other tweaks, but here is a simple way of getting info on your device and changing some settings not possible in the normal menus. Simply open the dialer on your phone and enter some numbers!

In the dialer enter *#*#4636#*#* You will then see a testing page, which gives you info on the phone, as well as battery stats and app usage stats. In the Wifi menu you can get info on the network you are connected to and more.

Entering *#*#7594#*#* will bring up the menu to adjust the power button action. Dependent on your ROM you usually see a list of actions such as ‘Reboot – Airplane Mode’ etc, this allows you to remove these.

*#*# 2432546#*#* If you use an HTC device, you can force a check for updates using this code. This will bring up a notification telling you whether or not it has been successful. Be careful if you are using a custom ROM , as some updates may not be compatible with it.
Volume Increase:-
Dial *#443366# on stock dial paid and follow this trick to increase volume
enter in to EngineerMode, plz be careful, do not change any data that you do not understand, or maybe cause many BUG and you device can not use.


How to increase ringtone volume for mobile phone, after setting the follow steps successfully, reboot your device.

keep the How to increase Mic Volume audio-normal mode type-mic
level
level 6 is the max
level 1 is min
after setting finished, reboot your device


For some version rom, we can not save the level 6. then follow this, only change the max vol to 160.

Download this freeware from the link given at the end of this review. The size of the file is 12.1 MB. It is a portable software and does not require any installation. Just run its executable file and you are done.
You need to start this application by right clicking on it and run as administrator. When you run this software, you will see a simple window, as seen below. In this window, you just need to add the list of websites that you want to block.
After that move the slider and set your desired time. You can choose time between 15 minutes to 24 hours and 45 minutes.
Here I chose 15 minutes for blocking the desired website. Next click on “Start” button. This will bring up a small countdown timer that will show time left for website to be unblocked. Once the time elapses, it will automatically unblock the websites.
This software is actually a modified form of a hosts file editor. Whenever you choose to block any website, it makes modification to hosts file of your PC and adds blocked websites to that.
When the time elapses, it just removes those websites from the Hosts file.
This software has a major flaw, since at least 2 years, that has not been fixed till date. When the timer runs, you have to let it keep running. If you exit the timer, then the websites that you had added to blocked list will remain permanently blocked!
There are a couple of ways to fix this problem:
Personally, I don’t find this software useful, as I can easily open Hosts file myself and make the changes. I would rather install some advanced computer time management software to regulate how much time I am spending on different websites.
However, the USP of this software is that it is pretty easy to use. I really wish that the developer fixes the long pending bug. Also, I hope there is an option to close the timer, as timer seems to be a constant reminder that some websites are blocked and it serves more of a distraction.
How to Reset/Recover Forgotten Windows 8 Password ?
It,s too common for people to forget their windows password. Today i am going to Show you How to Reset/Recover Forgotten Windows 8 Password ?
You need a HirenBootCD ( Download ) for this job. Burn ISO in CD or Create Bootable USB. Check my article How To Make Usb Drive Bootable From iso Image .
Lets start, Boot your Windows 8 from the CD . Select the Mini Windows XP Option. it will not install XP in your system. it,s just running live.
now Double click on the HBCD Menu Option.
now Click on the Programs in the Hirens Boot CD program launcher menu. then go to Password/Keys > Windows Login > then Select the NTPWEdit (Reset XP/Vista /7 User password ) option.
it will open the NTPWEdit wizard. By deafult it,s taking the current Windows root drive.
If your root drive is different is different, you need to be change it. Open My computer, you will find the disk information.
Now click on the Reopen option. it will show you the available users. Select your user and click on the Reset password option.
now put your new password.
Now click on the Save Change option. Now reboot your windows.
Now your are able to login in windows with your new password.

Design by Ashraf Shaikh | Developed Template by www.facebook.com/ashaikh43


")