Repair Outlook Express 2Gb DBX file

Windows

Even if we are still in 2013, some people still use Outlook Express (usually v.6 with Windows XP).The main problem of it, it’s the 2GB size limit for Inbox or Sent messages.

The error received is 0x800c0133 when trying to Send / Receive email. Also your INBOX may seem to be empty.
Outlook Express stores its messages in DBX files. To locate theese files you need to go in Outlook Express in : Tools | Options | Maintenance | Store Folder.

Locate the .dbx files and check if any of them has reached 2GB in size. If it’s not the case, this means one of the files may be damaged.

If you don’t care about the messages, you can rename the corresponding file. (If INBOX is empty rename inbox.dbx to something else, if Sent is empty rename sent.dbx to something else, and so on).

Close Outlook Express.

First thing to do is check for .bak files located in the same folder. They may be hidden, so be sure to check the “Show hidden files and folders” in Windows. If the INBOX seems empty, then rename inbox.dbx to something else, then rename the inbox.bak file to inbox.dbx.

Try to Open Outlook Express. If it’s still not working then you need to use a .DBX repair tool.

I recommend UnDBX – a free utility. This program can read a DBX file and export the messages as EML files. Thees files can then be imported in other email programs like Mozilla Thunderbird (by drag and drop).

It also has a “recovery checkbox” that can be used with damaged DBX files.
undbx-0.20

The program can be downloaded from Evilbox : undbx-0.20

Oter (paid) alternatives are : Repair Tool for Outlook Express or DBXpress.

Tags: 0x800c0133, 2GB limit, damaged dbx, inbox too big, outlook express

xolo valume setup by engineer mode


How-To-Fix-Low-Microphone-Volume-on-Xolo-A500S-5-Easy-Steps 2014-05-08 10-47-53

Secret to Unlocking Jelly Bean Service Modes

Buried in the comments of an androidcentral.com article showing a code to unlock "Service Mode," which allows for the testing of many features on the S3, I found the trick to open the gates of Valhalla! This works on my 4.1.2
The secret is to first type *#22745927 to get to an 'enable/disable hidden menu' screen. Check enable and you're good to go.
The code *#0*# gives this testing screen:

Also, the code *#0011# works to access "Service Menu" and change the Wifi Power Save to off. It is thought that this might solve the Wifi disconnecting problem for some people.
Here's the link where I found it: How to uncover and use the hidden Service menu on the Galaxy S3 | Android Central
These codes work, too, though I've only tested a couple:

  • *#1234# (View SW Version PDA, CSC, MODEM)
  • #7465625782*# (Insert partial Network Lock Keycode)
  • *746562527*# (Insert Network Lock Keycode NSP/CP)
  • #746562527*# (Insert Content Provider Keycode)
  • *746562577*# (Insert Network Lock Keycode SP)
  • #746562577*# (Insert Operator Lock Keycode)
  • #7465625638*# (Insert Network Lock Keycode)
  • *#2663# (TSP / TSK firmware update)
  • *#7780# (Factory Reset)
  • *27673855# (Full Factory Reset)
  • *#03# (NAND Flash S/N)
  • *#12580369# (SW & HW Info)
  • *#197328640# (Service Mode)
  • *#0*# (General Test Mode)
  • *#0228# (ADC Reading)
  • *#7465625# (View Phone Lock Status)
  • *7465625638*# (Configure Network Lock MCC/MNC)
  • *7465625782*# (Configure Network Lock NSP)
  • *#32489# (Ciphering Info)
  • *#7284# (USB I2C Mode Control)
  • *#272imei#* Product code
  • *#9090# (Diagnostic Configuration)
  • *#232337# (Bluetooth Address)
  • *#232331# (Bluetooth Test Mode)
  • *#232338# (WLAN MAC Address)
  • *#232339# (WLAN Test Mode)
  • *#0842# (Vibra Motor Test Mode)
  • *#872564# (USB Logging Control)
  • *#4238378# (GCF Configuration)
  • *#0283# (Audio Loopback Control)
  • *#1575# (GPS Control Menu)
  • *#3214789650# (LBS Test Mode)
  • *#745# (RIL Dump Menu)
  • *#746# (Debug Dump Menu)
  • *#9900# (System Dump Mode)
  • *#44336# (software Version Info)
  • *#0289# (Melody Test Mode)
  • *#7594# (Remap Shutdown to End Call TSK)
  • *#34971539# (Camera Firmware Update)
  • *#8736364# (OTA Update Menu)
  • *#526# (WLAN Engineering Mode)
  • *#528# (WLAN Engineering Mode)
  • *#7412365# (Camera Firmware Menu)
  • *#0589# (Light Sensor Test Mode)
  • *#273283255663282*# (Data Create SD Card)
  • *#3282727336*# (Data Usage Status)
  • *#301279# (HSDPA/HSUPA Control Menu)
  • *#7353# (Quick Test Menu)
  • *#2263# (RF Band Selection)
  • *27674387264636# (Sellout SMS / PCODE view)
  • *#80# (Unknown)
  • *#0782# (Real Time Clock Test)
  • *#0673# (Audio Test Mode)
  • *#07# (Test History)
  • *#3214789# (GCF Mode Status)
  • *#272886# (Auto Answer Selection)
  • *#0588# (Proximity Sensor Test Mode)
  • *#2732832553282*# (Data Create Menu)


By below link

http://androidforums.com

Micromax Mobile Sectret Codes

(1) *#06# :  this code show Emei Number

(2)  *#110*01#  : this code show Enter into Engineering Mode

(3)  *#987# :  this code show Enter into factory Mode

(4)  *#987*99# : this code show Restore Factory Settings

(5)  *#900# :    this code show Check Software Version

(6)  *#800#     :  this code Check Software Version

(7)  *#369#     : this code Change LCD Contrast:

Some Default User Codes here: 1122, 3344, 1234, 5678


To Enable COM Port: *#110*01# -> Device -> Set UART -> PS Config -> UART1/115200

How to change screen language your Micromax mobile

**#0000# + [Dial Button] : use Set Default Language

**#0044# + [Dial Button] : use Set Language to English

**#0966# + [Dial Button] : use Set Language to Arabic

**#0007# + [Dial Button]  : use Set Language to Russian

**#0033# + [Dial Button] : use Set Language to French

**#0034# + [Dial Button] : use Set Language to Spanish

**#0039# + [Dial Button] : use Set Language to Italian

**#0049# + [Dial Button] : use Set Language to German

**#0066# + [Dial Button] : use Set Language to Thai

**#0084# + [Dial Button] : use Set Language to Vietnamese

Note: We will not be responsible for any damage of your phone.

hidden features in Android


Most interesting hacks require root and other tweaks, but here is a simple way of getting info on your device and changing some settings not possible in the normal menus. Simply open the dialer on your phone and enter some numbers!

  1. Secret codes for Android – no hacking required!
    Basic phone info

    In the dialer enter *#*#4636#*#* You will then see a testing page, which gives you info on the phone, as well as battery stats and app usage stats. In the Wifi menu you can get info on the network you are connected to and more.

  2. Secret codes for Android – no hacking required!
    Change the power button action

    Entering  *#*#7594#*#* will bring up the menu to adjust the power button action. Dependent on your ROM you usually see a list of actions such as ‘Reboot – Airplane Mode’ etc, this allows you to remove these.

  3. Secret codes for Android – no hacking required!
    HTC Update checking

    *#*# 2432546#*#* If you use an HTC device, you can force a check for updates using this code. This will bring up a notification telling you whether or not it has been successful. Be careful if you are using a custom ROM , as some updates may not be compatible with it.

xolo Q800 Audio Increase

Volume Increase:-

Volume Increase:-
Dial *#443366# on stock dial paid and follow this trick to increase volume 
enter in to EngineerMode, plz be careful, do not change any data that you do not understand, or maybe cause many BUG and you device can not use.

How to increase ringtone volume for  mobile phone, after setting the follow steps successfully, reboot your device.

keep the How to increase Mic Volume audio-normal mode type-mic

level 
level 6 is the max
level 1 is min

after setting finished, reboot your device

For some version rom, we can not save the level 6.  then follow this, only change the max vol to 160.

Temporarily Block Selected Websites:

Using This Freeware For Blocking Access To Websites:

Download this freeware from the link given at the end of this review. The size of the file is 12.1 MB. It is a portable software and does not require any installation. Just run its executable file and you are done.

You need to start this application by right clicking on it and run as administrator. When you run this software, you will see a simple window, as seen below. In this window, you just need to add the list of websites that you want to block.

selfrestraint adding website

After that move the slider and set your desired time. You can choose time between 15 minutes to 24 hours and 45 minutes.

selfrestraint timer start

Here I chose 15 minutes for blocking the desired website. Next click on “Start” button. This will bring up a small countdown timer that will show time left for website to be unblocked. Once the time elapses, it will automatically unblock the websites.

selfrestraint timer 1

How Does SelfRestraint Actually Works:

This software is actually a modified form of a hosts file editor. Whenever you choose to block any website, it makes modification to hosts file of your PC and adds blocked websites to that.

When the time elapses, it just removes those websites from the Hosts file.

SelfRestraint Hosts File Entry

Bug in SelfRestraint:

This software has a major flaw, since at least 2 years, that has not been fixed till date. When the timer runs, you have to let it keep running. If you exit the timer, then the websites that you had added to blocked list will remain permanently blocked!

There are a couple of ways to fix this problem:

  • Start SelfRestraint software again and add the same list of websites to it. Set the timer for 15 minutes. Once the time elapses, it will unblock all the websites.
  • Or, just go to Hosts file of your computer and remove entries for those websites.

Key Features of this software to temporarily block websites:

  • Selfrestraint is a freeware.
  • Selfrestraint helps you in blocking distracting websites for a short time period.
  • Selfrestraint is a cross platform application.
  • It does not require any installation.
  • Selfrestraint is compatible with Windows XP/Vista/7/8/8.1.

My Opinion About Selfrestraint:

Personally, I don’t find this software useful, as I can easily open Hosts file myself and make the changes. I would rather install some advanced computer time management software to regulate how much time I am spending on different websites.

However, the USP of this software is that it is pretty easy to use. I really wish that the developer fixes the long pending bug. Also, I hope there is an option to close the timer, as timer seems to be a constant reminder that some websites are blocked and it serves more of a distraction.

DOWNLOAD HERE

OTHER WAY TO RESET WINDOWS 8 PASSWORD

How to Reset/Recover Forgotten Windows 8 Password ?

It,s too common for people to forget their windows password. Today i am going to Show you How to Reset/Recover Forgotten Windows 8 Password ?

You need a HirenBootCD ( Download ) for this job. Burn ISO in CD or Create Bootable USB. Check my article  How To Make Usb Drive Bootable From iso Image .

Lets start, Boot your Windows 8 from the CD . Select the Mini Windows XP Option. it will not install XP in your system. it,s just running live.

now Double click on the HBCD Menu Option.

now Click on the Programs in the Hirens Boot CD program launcher menu. then go to Password/Keys > Windows Login > then Select the NTPWEdit (Reset XP/Vista /7 User password ) option.

it will open the NTPWEdit wizard. By deafult it,s taking the current Windows root drive.

If your root drive is different is different, you need to be change it. Open My computer, you will find the disk information.

Now click on the Reopen option. it will show you the available users. Select your user and click on the Reset password option.

now put your new password.

Now click on the Save Change option. Now reboot your windows.

Now your are able to login in windows with your new password.

CHANGE WINDOWS 8 PASSWORD IF YOU FORGOTTEN

Windows 8 - Lost / Forgotten Password?

Problem

There are many reasons why you might want to do this, someone has managed to change a user password and that person is not available, you might simply have forgotten it. Or you might have been given a machine, or bought one from ebay that has come without a password. Also there have been a few times when a user has looked me in the eye and said "I'm typing my password in, but it's not working", I have never seen a password change on it's own, so I will just put that down to the evil password gremlins.

The procedure will also work on the Windows 8 local administrators password, just bear in mind that his account is disabled by default. This procedure will not work if the machine in question has had its hard drive encrypted using BitLocker.

You can avoid this procedure if you have access to another account on this machine that has administrative access. If you can log on as an administrator, then you can change the password of other local accounts on the affected machine without the need to do this.

Solution

How to Burn the ISO Disc Image

1. Download the Password Reset CD Image.

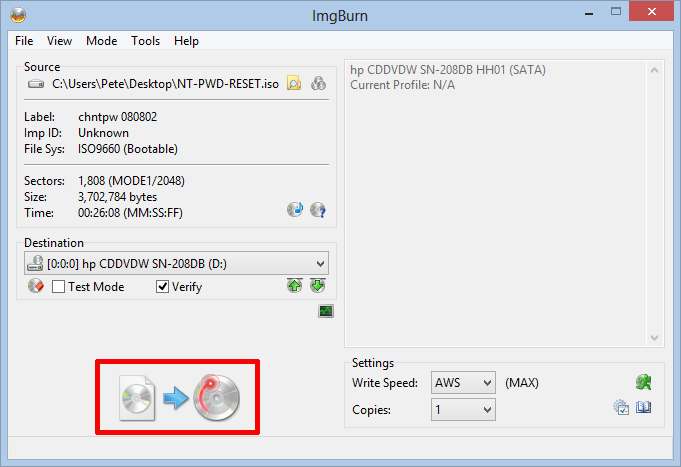
2. Download ImgBurn and install, Launch the program, if it does not look like this you need to select View >EX-Mode-Picker. Select the 'Write image file to disc' option.

ImgBurn Burn Disk Image

2. The file you downloaded is a zip file that contains the disk image, you will need to extract the image from the zip file (i.e. drag it to your desktop). From within ImgBurn launch the browse option and navigate to the disk image you have just extracted > Open.

Burn an ISO

3. Select the burn to disc icon (Note: This will be greyed out, until there is a blank CD in the drive). The image is very small, it will not take long to burn.

CD Image

Carry Out a Windows 8 Password Reset.

This procedure uses the boot CD you have just created, for it to work you need to make sure the machine will attempt to boot to its CD/DVD Drive before it boots to its hard drive. (Or it will simply boot into Windows again). This change in 'Boot Order' is carried out in the machines BIOS, how you enter this varies depending on machine vendor, when you first turn on the machine watch for a message that looks like Press {key} to enter Setup. Typically Esc, Del, F1, F2, or F9. When in the BIOS locate the boot order and move the CD/DVD Drive to the top of the list.

1. Boot your machine from your freshly burned CD, when you see this screen simply press {Enter} to boot.

Windows 8 Lost Password

2. Depending on how many disks/partitions you have it will discover them and assign a number to each one, here I only have 1 so I will type '1 {Enter}'.

Note: You may see a small 300Mb partition, ignore that. You may also see your machines recovery partition if it has one, if that's the case you may have to carry out some trial and error to get the right one.

Recover Windows Password

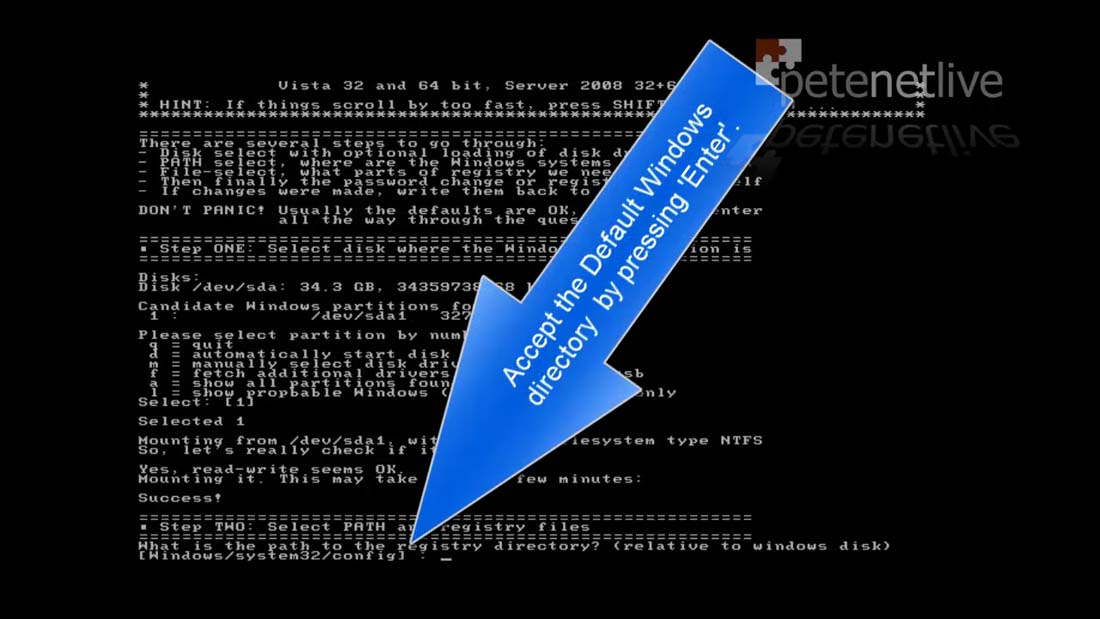
3. The system is set to look for the default registry location C:\Windows\System32\Config so simply press {Enter}. If it fails at this point you selected the wrong drive/partition.

Forgotten Password Windows

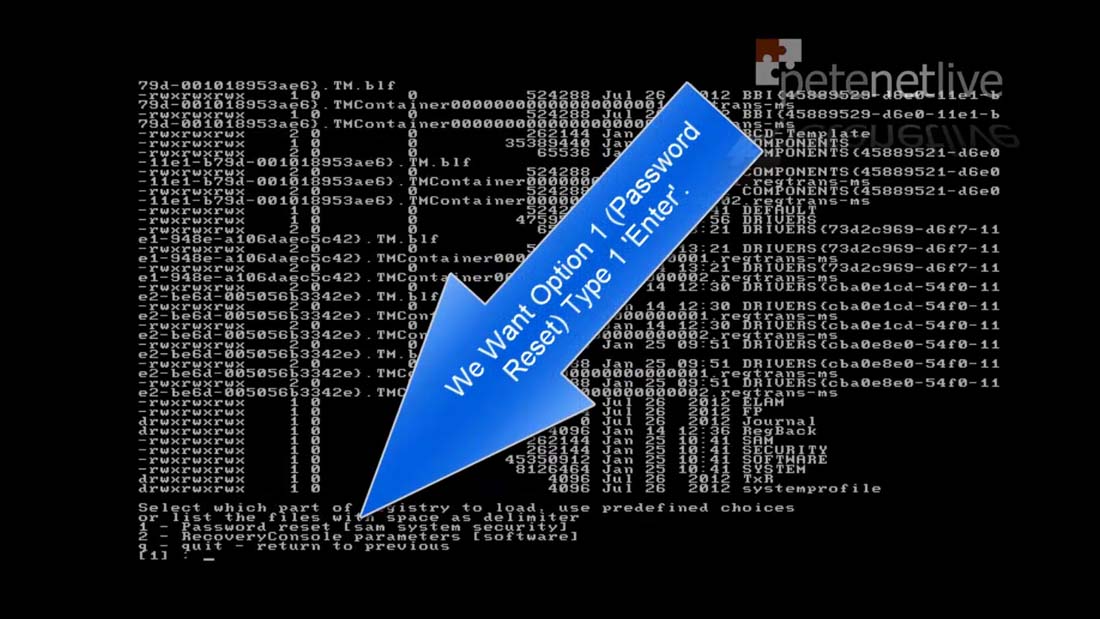
4. We want password reset so select option 1.

Reset Password Offline

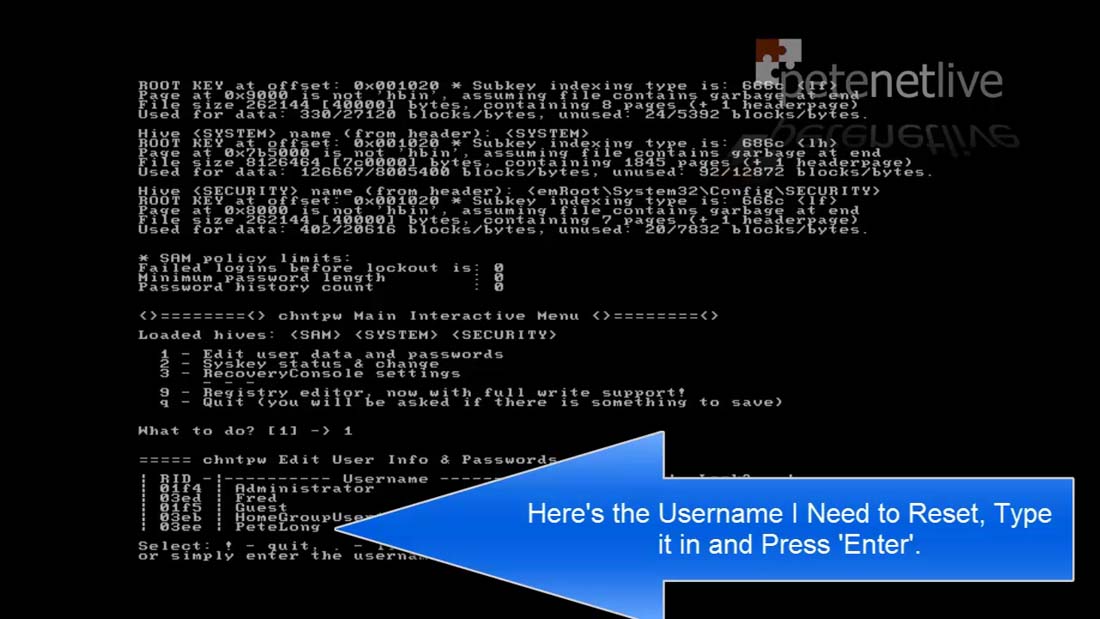
5. We will be editing user data and passwords, so again select option 1.

Edit User Data and Password

6. You will be presented with a list of the user objects that it can locate, here I want to reset the password for the 'PeteLong' user object so simply type in the username you want to edit.

Note: As mentioned you can see here the administrator account is disabled, if you want to work with that account, you will need to unlock and enable it on the next screen before you blank or change the password.

Locate Local Users

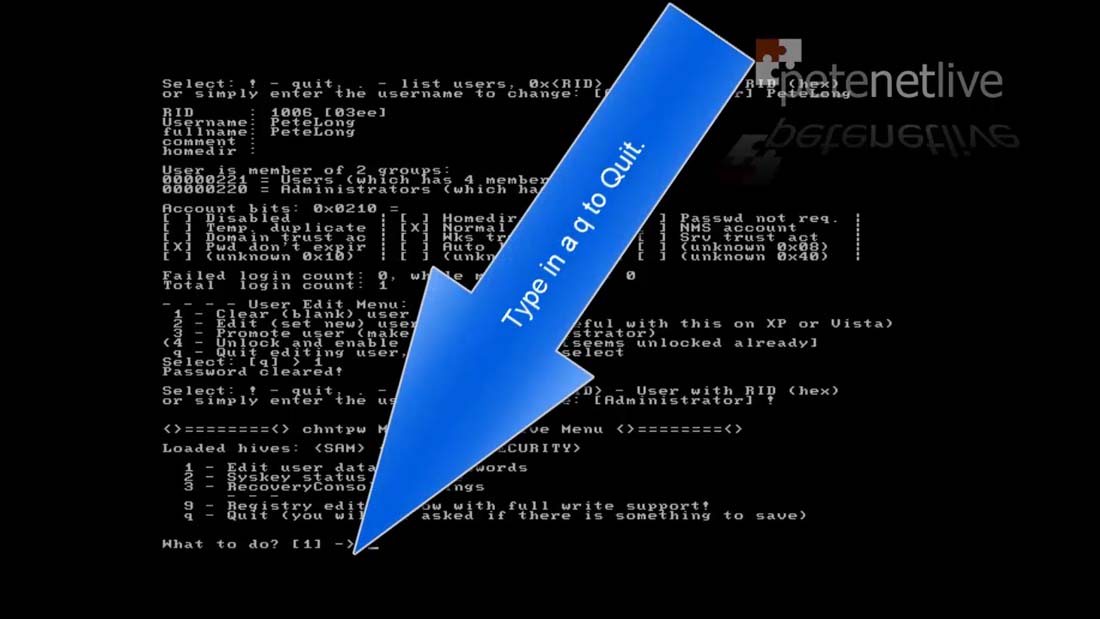
7. You can choose option 2 and type in a new password, but I'm going the blank the password, then change it when I get back into the machine by selecting option 1.

Locate Local Users

8. To step back you need to enter an exclamation mark.

Quit Boot Disk

9. Enter a 'q' to quit.

Step Backwards

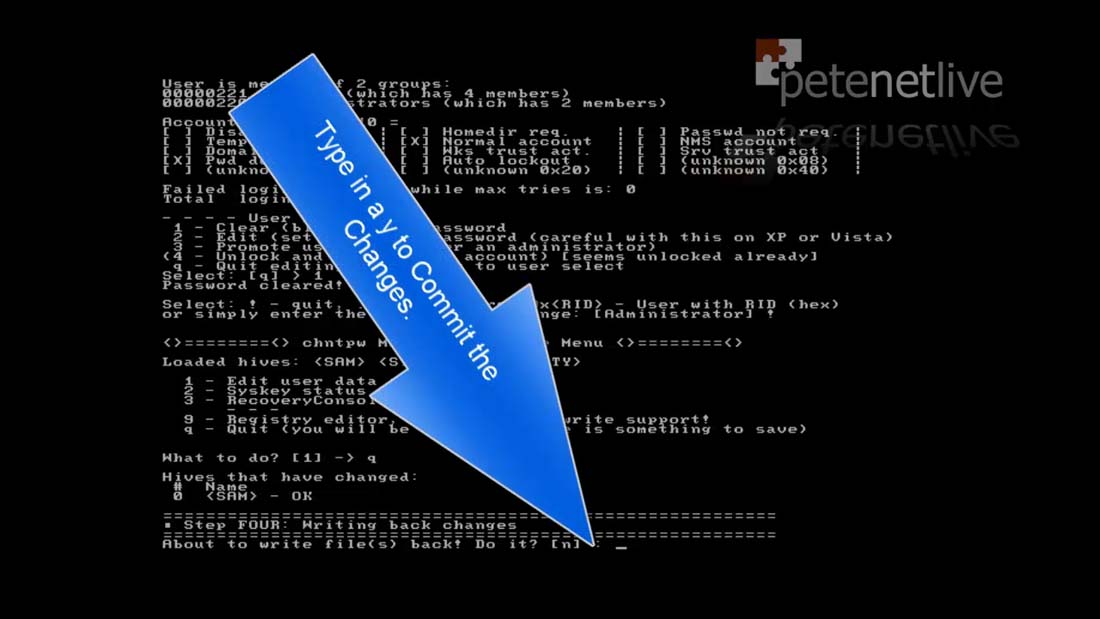
10. To write the changes you have made enter a 'y'.

Commit Changes

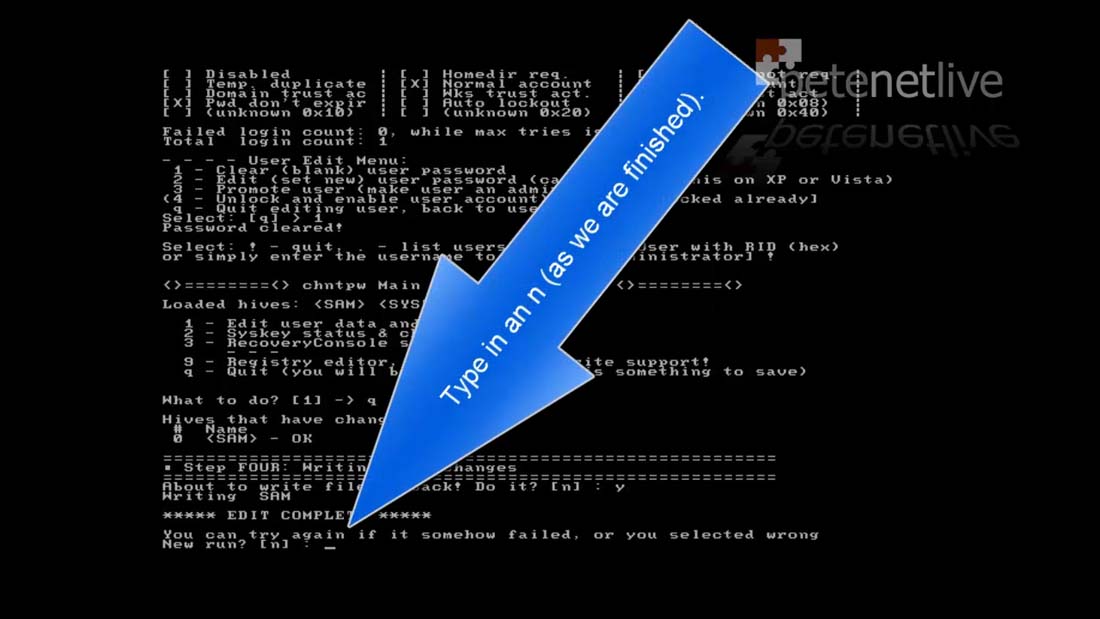
11. As long as you are happy, and have no other accounts that need changing, enter 'n'.

Exit Boot Disk

12. Now remove the boot CD, and press Ctrl+Alt+Delete to reboot the machine.

Reboot PC

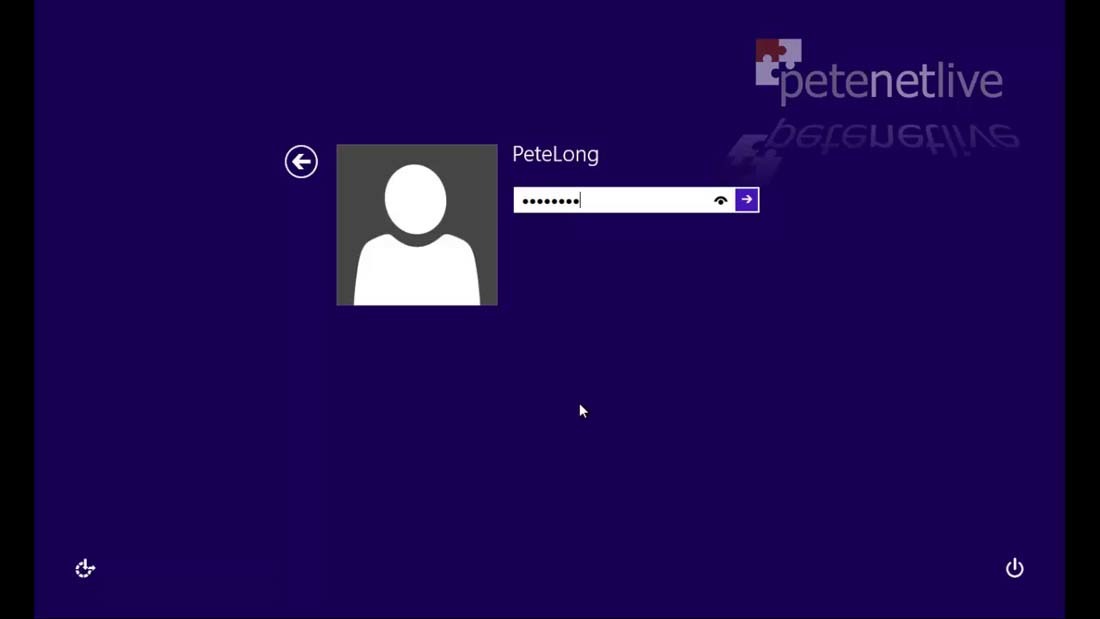
13. As the user object we are dealing with was the last one that has logged on, it will select that account as soon as the computer boots, and now it has a blank password it will automatically log on.

Password Reset

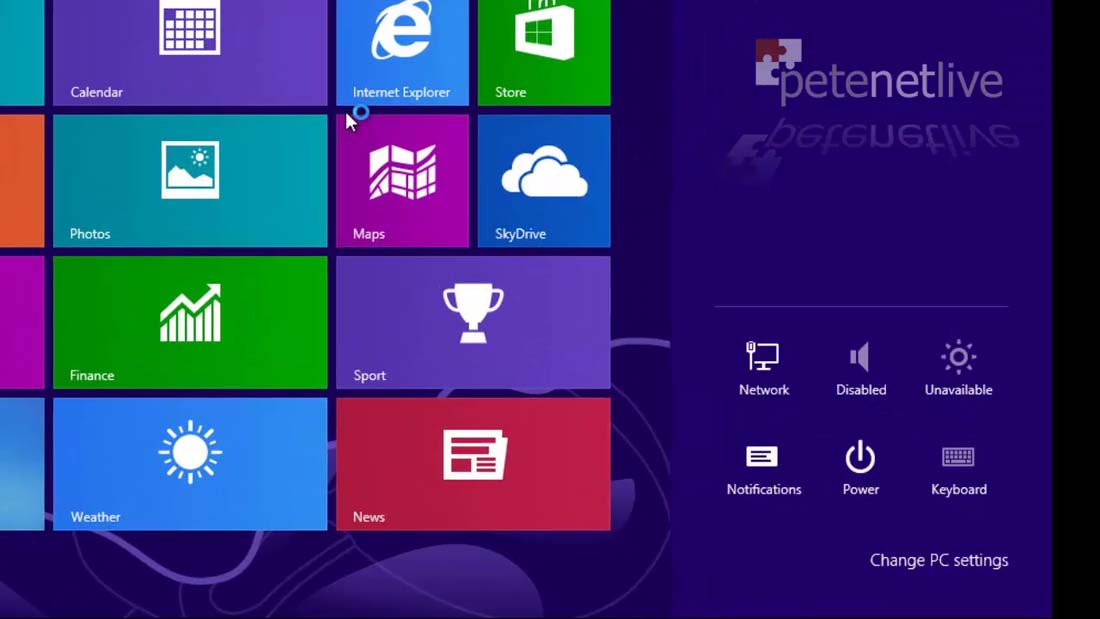
14. To change the password, press Ctrl+I > Change PC settings.

Change PC Settings

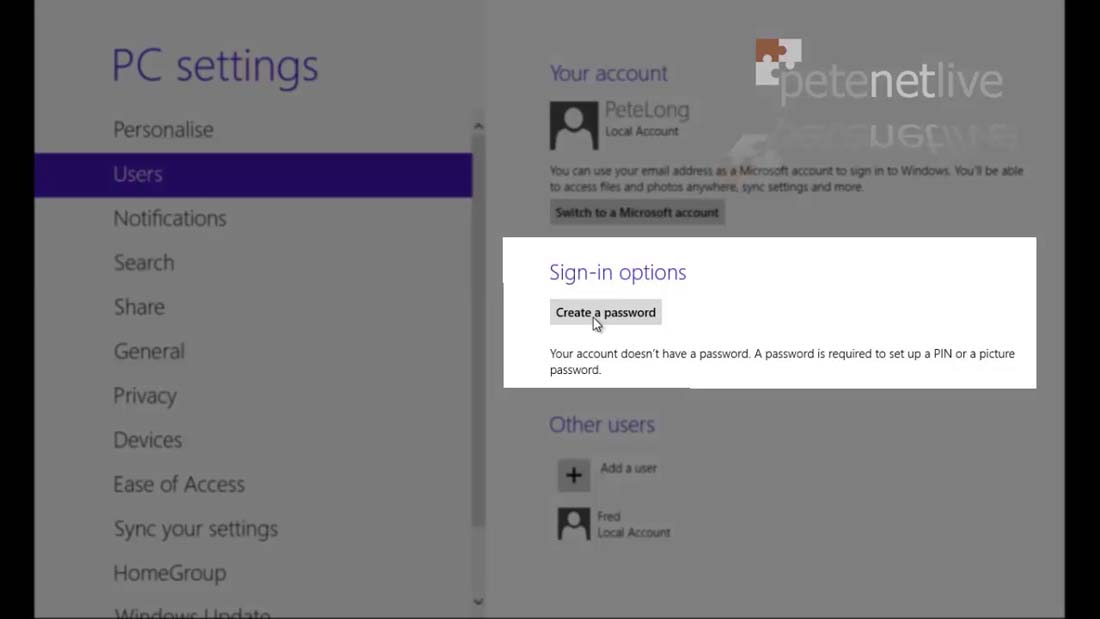
15. Users > Create a password.

Reset User Accounts

16. Type and confirm your new password, and enter a password hint > Next.

New Password

17. Log off the account and test the new password.

Test User Password

Tableegi Nisaab apke adalat me

Fazail e Amaal a book written by Molana Zakariya on the advice of Molana Ilyaas . He wanted to give this book as form of course (نِصاب) to the people who joined this Jamat. As mentioned in the Introduction of Fazail e Amal , the doctor had advised Molana Zakariya not to do any stressful job as he had some complications with his brain but going against the doctor advice and to bide time Molana Zakriya Penned down Fazail E Amal.

Now please go through the lecture , keep a copy of Fazaail e Amal with you and see for yourself the places where it contradicts Quran and Sunnah.

Download
Name
Play
Size
Length

download Tableeghi Nisaab AapKe Adalat Me Part1
9.8 MB
42:41 min

download Tableeghi Nisaab AapKe Adalat Me Part2
9.9 MB
43:06 min

download Tableeghi Nisaab AapKe Adalat Me Part3
10.7 MB
46:34 min

download Tableeghi Nisaab AapKe Adalat Me Part4
10.1 MB
44:16 min

download Tableeghi Nisaab AapKe Adalat Me Part5
10 MB
43:33 min

download Tableeghi Nisaab AapKe Adalat Me Part6
10.8 MB
47:20 min

download Tableeghi Nisaab AapKe Adalat Me Part7
10.6 MB
46:16 min

download Tableeghi Nisaab AapKe Adalat Me Part8
10.2 MB
44:34 min

download Tableeghi Nisaab AapKe Adalat Me Part9
7.5 MB
32:54 min

download Tableeghi Nisaab AapKe Adalat Me Part10
10.4 MB
45:20 min

download Tableeghi Nisaab AapKe Adalat Me Part11
9.9 MB
43:21 min

Powered by Blogger.

Design by Ashraf Shaikh | Developed Template by www.facebook.com/ashaikh43